Zeroranger TLB Guide
GHub Platform · Гайд · 0 ответов · 17 просмотров
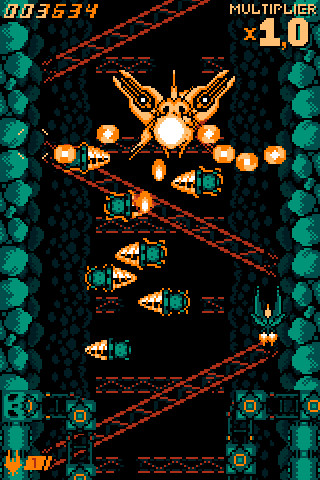
I wanted a guide for this boss and just general advice while I was playing the game, and there wasn't one, so now I've beat it I made one. Enjoy, and heavy spoilers warning! This is a boss that you'll potentially have to fight many, many times if you're going for the System Endless achievement. So with that in mind this guide covers methods for mitigating attacks, non-obvious things a lot of players could easily miss, and basically gives canned responses for dealing with her. Learning a boss is part of the fun of dealing with them, but sometimes reading tips or getting advice can help players achieve a breakthrough when they're stuck. I know I would've loved some advice and help other than just resorting to watching youtube videos of the fight being done. Oh and apologies for the low-quality screencaps, I took them from a youtube video. They're purely illustrative so I didn't care about getting them in particularly high quality. I'll keep this section short since it's not very complicated. On your way down to the boss, you'll be attacked by orange slimes and blue slimes. Orange slimes die to guns and blue slimes die to the sword/drill. You can sometimes farm an extra life here if nothing else so it's good to know. For the single orb, position yourself slightly off-centre from the spot directly in front of it and slide gently left and right. It will never hit you. For double orbs, don't sit at the bottom, you will die. Move to the opposite side of the screen from the orbs and keep them at maximum distance. Switch to a secondary weapon like the side-shot or back-shot. Homing shot is the best option if you have it and will kill both orbs in two cycles. For triple orbs... move to the right side of the screen and slowly slide to the left. This phase is the easiest by far. For all six orbs, just focus on shooting straight up. If you kill them quickly they won't get a chance to attack at all. Anyway! On to the stuff that actually matters. Okay! This is what you're here for. Read on. Despair is a heavily RNG-based boss that cycles through various attacks at random. Sometimes she will completely capitulate and give you incredibly easy patterns, other times it will feel like she is spamming her rudest attacks over and over and starting new attacks before the previous ones are even finished. If the screen is getting too cluttered, simply stop going offensive and take a moment to focus on dodging. Her name of "Despair" fits perfectly because there's multiple factors of this fight that are bullying and will make you want to give up (like the very sudden and brutal death throes phase once you think the fight is over for one). But she really isn't that hard and you shouldn't give up. The information about her health below was provided by battle b2: Despair has four health bars, starting with a strobing bar that doesn't show damage progress. If you can clear the first health bar, your new death checkpoint will be from there, reducing the fight down to three health bars. Just remember if you die, it's usually okay as long as you ground her HP down a bit. Attrition is the main factor here. Small Hands There's two varieties of this attack but they're both very simple and if you're here you've already dealt with this sort of thing plenty. Just slide back and forth at the bottom of the screen, or go up the edges if you need extra room. Sometimes she will do this at the bottom of the screen, so give her space if she's hanging around down there. Switch to another weapon like the back-shot or the homing shot rather than trying to get under her because she WILL punish it. Big Hands Hands move diagonally across the screen. It seems like the entire hand is damaging but you can sit on the outstretched fingers without being hit. Move in circles to avoid the spray bullets that appear and are difficult to spot. There's a version of this attack that she'll bring out sometimes when the fight is basically over, it's practically impossible to get hit by it as long as you just keep moving. Arm Sweep This attack works from your own momentum. If you happen to be moving left when she initiates it, she will also drift left, and the same with the other directions. Rapidly juke and change direction so she drifts away from you. Also the horizontal hitbox seems to be slightly wider than the vertical one so moving up and down is generally better than side-to-side, as long as there's room to do so. Drills Legitimately hate this attack and don't have a good solution for it. Just focus on dodging and worry about damaging her later. The main advice I can think to offer is that if a lot of drills have passed through part of the screen already, it's usually safe to go and hang out there until the attack ends. It also has a nasty habit of overlapping with other attacks so look forward to that. If anyone has tips for this leave a comment and I'll add it in. Diagonal Lasers This attack is the main reason you'll want to hang around the bottom 1/3 of the screen. Once it comes out, immediately push against the bottom wall and stay there, moving parallel to the vortex the lasers are emerging from. Move left and right to avoid the flames, and when the vortex gets too close to the far left/far right, simply cross over it to the other. This might be one of her easiest attacks to dismantle so it's really good if it comes up multiple times. Swords Just choose a side of the screen and sit relatively still. Most attacks will miss you, so just make slight adjustments when the orange glow begins to appear under you. The second phase of this attack where the swords at the bottom of the screen turn into shruikens is much more aggravating mostly because it will usually still be lingering on the screen by the time she's started her next attack. Look at the left and right sides of the screen and make a judgment on which is less cluttered and try to get down quickly, destroying the shruikens with whatever appropriate weapon you might have. If they're both cluttered, take a chance on the middle and hope you don't get messed by a bad pattern. Samsara Wheel You've probably already figured this out if you're spending enough time on this boss to want to look up a guide but only the drawn lines in this attack are damaging. You can sit inside the wheels and smaller areas fine as long as the orange jewel part of your ship isn't clipping anything. I found this a little buggy though so I would usually try to get fully out of it if I could. DEATH THROES ATTACK: Something that's especially important about her last phase: when she appears and starts channelling the attack, she will usually be off-centre from you so the first thing you want to do is see where she is in relation to your character. If she's on your right, go left, if she's above you, go down, etc. You will NEVER get hit by this attack if you remember this one simple thing. Because of this, try to stay near the centre of the screen if you can, but if you ARE on the edge, don't sweat, she seems more likely to appear closer to you when you do this so you'll be fine. Ship This attack is less difficult than it looks. The laser balls don't damage you, just the beams they drop off after. Moving in circles around the screen is mostly pretty reliable. Mecha Very simple phase, about all I can think to mention is avoid attacks towards the bottom of the screen rather than the top so you have more space overall. Petals 1 No sweat, just slide in whenever. Petals 2 This phase mixes it up by adding orb pairs to the orb quartets. It's a bit sneaky but you can't go on patterns where there's a pair like this, you'll just get knocked back. Wait for this pattern and go between the two quartets. Petals 3 This phase is also much more simple than it initially looks. The petal fire goes clockwise and anti-clockwise around the flower, as indicated by an audio cue. The sets of six orbs will be fired either horizontally or vertically, and you can see which will be next by looking at
ИсточникGHub Platform · автор25.08.2026, 20:59:57
I wanted a guide for this boss and just general advice while I was playing the game, and there wasn't one, so now I've beat it I made one. Enjoy, and heavy spoilers warning! This is a boss that you'll potentially have to fight many, many times if you're going for the System Endle…
Войдите, чтобы писать в группе