Beginner's Flight, HUD, Economy and Survival Guide
GHub Platform · Гайд · 0 ответов · 17 просмотров
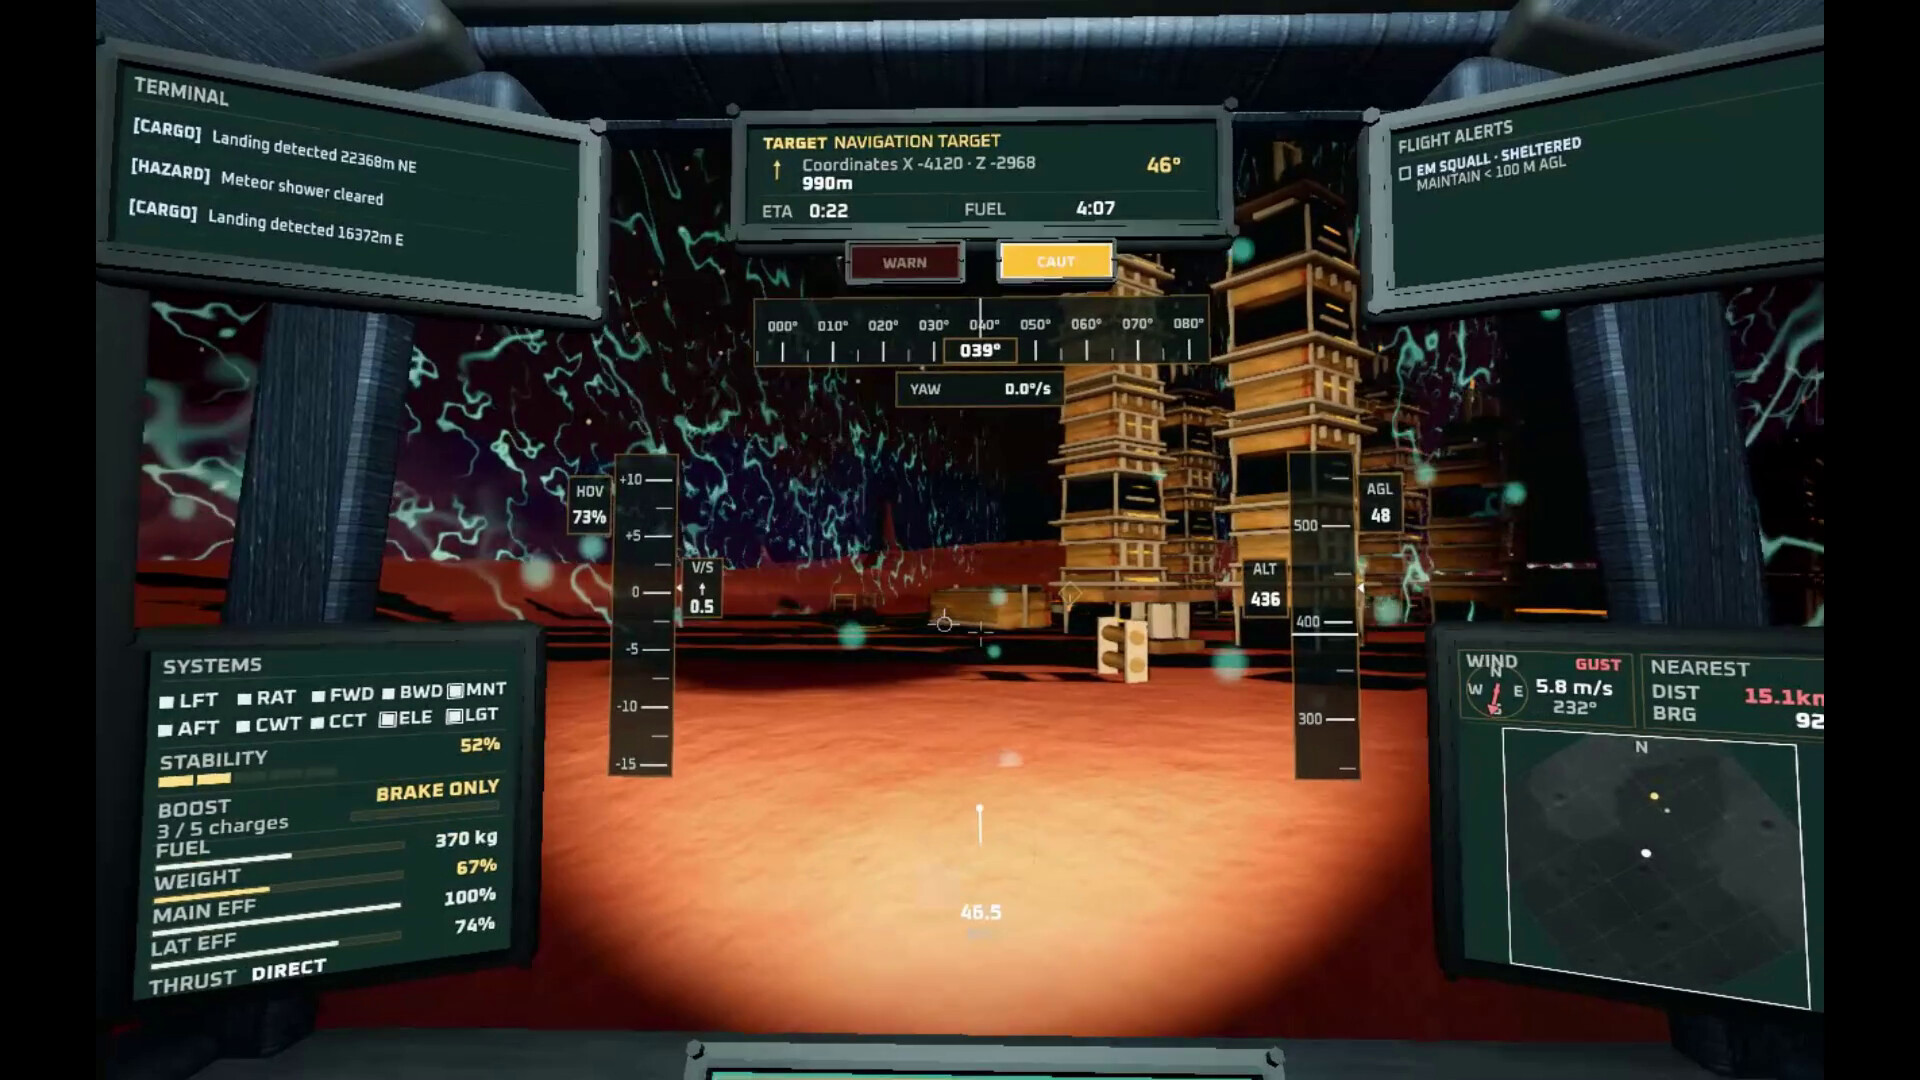
Void Cargo is a first-person cargo flight game built around weight, momentum, and pressure. You are not darting around like an arcade ship. You are managing a working machine that becomes heavier, slower, and less forgiving depending on what you carry and how prepared you are. The game mixes three things at the same time: piloting, survival, and money management. A good run is not just about reaching the destination. It is about reaching it without spending more fuel, repairs, and booster charges than the job was worth. Your short-term goal is simple: take jobs, move cargo, land safely, and keep flying. Your long-term goal is to build a ship and a bankroll that can handle worse weather, longer routes, heavier jobs, and more expensive mistakes. That means progress is not only measured in credits. Progress is also measured in how calmly you can fly, how well you read the cockpit, and how rarely you turn a profitable contract into a repair bill. Most runs follow the same basic rhythm: Land at a base and check what jobs are available. Pick a contract that matches your ship, your fuel situation, and your confidence. Load the cargo, set a waypoint, and plan the route. Lift off, manage the flight, and react to hazards on the way. Deliver the cargo or drop the offering. Refuel, repair, restock, upgrade, and decide what to do next. That loop sounds simple, but the important part is that every decision connects to the next one. A heavy job changes your handling. A rough landing changes your repair costs. A risky route can pay well, but only if you arrive in one piece. New players usually do not fail because they do not understand the goal. They fail because they rush the parts of the game that punish impatience. Taking jobs that are too heavy too early. A profitable contract is still bad if your ship struggles to lift, hover, or land with it. Treating fuel as free. Fuel is both your lifeline and part of your mass. Carrying too much can make the ship feel sluggish; carrying too little can leave you boxed in. Landing too fast because the pad is already underneath you. Most bad landings are decided before the last few meters. Using BOOSTERS to fix bad planning. Boosters are strongest when used deliberately, not as a panic button every time the ship starts drifting. Ignoring damage until several systems are degraded at once. Small problems get expensive quickly once you are far from a proper base. Spending every credit immediately. Leave room for fuel, repairs, and recovery. A ship upgrade is not helpful if it strands you after the next contract. If you keep those six mistakes in mind, the rest of the guide will make much more sense. The most important thing to understand is that the ship keeps the consequences of your last input. If you lift too hard, you will keep climbing. If you drift sideways, that drift has to be worked off. If you rotate too much, you still need to settle the craft before the landing is clean. Think in corrections, not in constant motion. The ship rewards small adjustments much more than dramatic ones. When you are stable, use that stability. Do not keep adding movement just because the controls are available. Vertical control decides most landings. Safe landings usually come from managing descent early, not from a last-second save near the pad. If your descent is already under control, the final touchdown becomes much easier. Horizontal drift is the silent killer. A landing can look fine from the front and still go wrong because the craft is sliding sideways. Before touchdown, make sure you are not only descending slowly, but also moving across the ground more than you think. Horizontal drift is the silent killer. A landing can look fine from the cockpit and still fail because the ship is sliding sideways. Before touchdown, get the horizontal speed ring close to zero, not just the vertical speed tape. Yaw matters because it changes how you read the approach. A stable heading makes landing and route correction easier. If the yaw rate strip is not near zero, the ship is still rotating and every other correction gets harder to judge. Heavy flights are different flights. Cargo and fuel change how much thrust you need and how forgiving the craft feels. If a run feels worse than the previous one, that is often not your imagination. The loadout probably changed the handling. BOOSTERS are one of the most valuable tools in the game, and they are also one of the easiest systems to waste. Their main job is not fine control. Their main job is to get you up to travel speed once you already know where you want to go. The right pattern is simple: pick your direction, settle the ship, commit to the line, and then boost. In other words, BOOSTERS are best when they turn a stable intention into strong forward progress. They are much worse when you fire them while still deciding where the ship should be going. Good uses for BOOSTERS: Accelerating into cruise or travel speed after you have already lined up the route. Covering distance efficiently once the ship is pointed the way you want. Escaping a bad position when you have a clear exit line. Recovering from danger with a committed burst, not a hesitant one. Bad uses for BOOSTERS: Using them like precision thrusters during careful maneuvering. Firing them before your heading and drift are under control. Burning charges to compensate for poor landing setup. Using them on every takeoff because normal liftoff feels slow. The best way to think about BOOSTERS is this: they are for committed acceleration , not for delicate handling. If you want to maneuver, use normal thrust and clean corrections. If you want to lock in a direction and build speed, that is when BOOSTERS shine. The HUD matters because it tells you what the ship is doing, not just what you want it to do. When you start out, do not try to read everything equally. Learn which instruments answer which question. Full cockpit HUD overview Crosshair and Drift Indicator The small reticle is where the ship is pointed. The separate circle marker shows where the ship is actually moving. If those two are apart, you are drifting. Vertical Speed The tape shows climb and descent rate in m/s, and the side box is your current value. Positive is up, negative is down. On landing, trust this more than the outside view. Hover Thrust Indicator The HOV box shows the thrust percentage needed to hold altitude right now. If that number is high, the ship is heavy or inefficient and has less spare lift for recovery. Altitude Readout The right tape gives two readouts: AGL is height above the ground directly below you, ALT is absolute elevation. Watch AGL on approach, because that is your real landing clearance. Heading Bar The left side is your current heading in degrees and cardinal direction. The middle target block shows the selected destination, its distance, and its bearing. Yaw Rate This strip shows rotation speed in degrees per second. If it is not near zero, the ship is still turning even if the outside view feels almost stable. Fuel Time This strip shows ETA to the current target and estimated fuel endurance at your current burn rate. If fuel time drops much faster than ETA, you are spending fuel too aggressively. System Status Panel Each square is a ship system. Green means healthy, yellow means degraded, red means offline. If something feels wrong after a hazard, this tells you what actually got damaged. LFT = Left Thruster, pushes the ship right. RAT = Right Thruster, pushes the ship left. FWD = Forward Thruster, pushes the ship backward. BWD = Backward Thruster, pushes the ship forward. MNT = Main Thruster, your main lift for takeoff, climbing, and hovering. AFT = Aft Thruster, the downward-facing thruster used for descent control. CWT = Yaw Clockwise, one half of your right-turn rotation control. CCT = Yaw Counter-Clockwise, one half of your left-turn rotation control. ELE = Electronics, which includes the full HUD. LGT = Headlight. Wind Panel The arrow s
ИсточникGHub Platform · автор30.08.2026, 06:27:42
Void Cargo is a first-person cargo flight game built around weight, momentum, and pressure. You are not darting around like an arcade ship. You are managing a working machine that becomes heavier, slower, and less forgiving depending on what you carry and how prepared you are. Th…
Войдите, чтобы писать в группе